Friday, April 25, 2008

Activity of Finding Examples of Balance and Focal Point in Magazines... Forgot the Date!!! =[

I have never, in my whole life, looked at magazines by judgine whethe the pictures contained the principles of art, but I did that today in art. In the lesson, we ripped out pages from various magazines that contained the two principles of art; balance, and focal point/ emphasis. This helped me to understand what balance and focal point were much easily. I was amazed at how the photographs were taken; they all had balance by having different shapes, colours and lines mixed together. However, they all looked very natural and seemed as if they were just taken radomly! In my opinion, I think photography is a type of art as well, even though some say it's not.


Most, no, actually all of the pictures I ripped out were all asymmetrically balanced with a definite focal point, since there weren't any symmetrical advertisments in any of the magazines. I examined and sometimes asked others whether the pictures were appropriate. In the end, I chose five pictures that showed the two principles the most out of the whole magazine.

I also had to write about each one, saying why I chose it and where and how it actually showes balance and focal point.

Here are some photos scanned from my art diary:

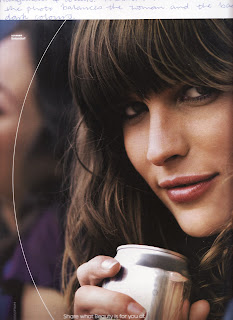
I asked Mrs Vincent why this one was balanced, and I learnt that the white arc at the left of the picture balanced the woman's dark hair. Also, the silver, tin can balanced the dark hair and the face.


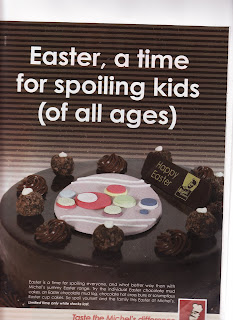
This picture definitely has a focal point by contrasting the warm colours and the cool colours. The pastel- toned pink at the centre of the cake and the white text contrasting to the dark background are the focal points. However, the picture is balanced as well, since there is the white text balancing with the dark chocolate mud cake with the pastel- toned decoration.


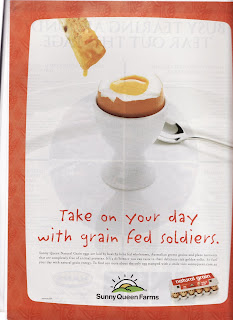
This photo has a very clear focal point; the boiled egg in the egg holder is the focal point. (Obviously!) This picture leasds the audience's eyes to the egg by placing it at the centre with white background in contrast to the egg's yolk. Also the size of egg helps being the focal point.

Thursday, April 24, 2008

Balance Activity... Don't Know the Date!!! =}

Balance is one of the principles of art. There are two types of balance; asymmetrical balance and symmetrical balance. Asymmetrical balance is when there is a work that is not exactly the same on both sides of the picture but is still creating the feeling of balance, and symmetrical balance is just as what it is; a work that is literally symmetrical on both sides. (When I say both sides, I mean sides like left and right or top and bottom. This depends on the middle axis that divides the work into two parts.)
We learnt and experimented more on this principle of art by having different coloured paper and sticking them on as different shapes, creating an example of a symmetrically balanced picture and an asymmetrically balanced picture. I realised that the type of colour used, such as whether it is cool or warm, and the size and arrangements of different shapes affected the feeling of having balance. Mrs Vincent also told us that warm colours stood out more than cool colours, so they were smaller in size to be balanced. Truly, when Mrs Vincent showed all of us a small piece of red paper with a large piece of blue, they looked balanced!
So, yes, I learnt a lot today and will probably do some more work on this principle next lesson as well.

Here is my example of SYMMETRICALLY BALANCED WORK:

Here is my example of ASYMMETRICALLY BALANCED WORK:
(Sorry for the quality of the images! The scanner couldn't really fit my art diary.)

Monday, March 24, 2008

My Collection of Sketches of Observational Drawings...

This is a collection of sketches that I did in class; they are observational drawings of a panda.

My first drawing was a two- minute continual drawing. I had started much better, but I realised I had drawn it too small, so I wasted one and a half minutes rubbing out my drawing! It was quite frustrating when I only had barely thirty seconds and I couldn't take off my pencil because it was 'contiunual drawing'!!!


The next activity was two- minute blind contour drawing. I had to draw this without looking once at my paper and only look on the object I was drawing. I also vainly tried to show the fur, but it turned out not working at all. The face looks very interesting!!! :D

After that, I was at the hardest stage of the whole activity. This activity was blind contour drawing.It was the hardest that we did, in my opinion. It is impossible to be beautiful when you are drawing with continuous lines without looking at what you are drawing. As expected, my drawing turned out hideous. No texture tone, nothing but squiggly lines! Thanks to this, we all had a good laugh at each other's drawings that looked like three- year olds.


Next drawing was a drawing of ten- minute observation. It looked much better than teh former drawings, but there should have been fur and some tone/shadows. It looks incomplete and bare... =.}


This drawing shown below was the sideview of the panda; just as the former one, it needed to tone and at least some indications of fur as well. I drew this because I was told to draw it at a different angle of view or get a new stuffed toy to draw, and I thought sideview of the same toy would be good to draw. So here it is!

My Term 1 Observational Drawings Folio (Assessment)... Do You Like 'Em???

This was the style of Andy Warhol, even though it looks nothing like it! The background was mimicked in his ways. Click on the picture for a larger view!!!


This was a stick- with- ink drawing of my panda, which I had written reflections about how I had to work on it at lunchtime. It doesn't look that bad when it's scanned on!!! The tone and the line were the main elements in this activity. The background should have been, however, more distinct because it looks quite bare.


Friday, March 14, 2008

A Video Clip About Andy Warhol Exhibition...

This is a video clip about the Andy Warhol Art Exhibition in Brisbane. (2008) It's part of one of the Channel 9 shows... Enjoy! (It might take a while to load, though.) I would love to go there sometime!!!

13th March & 14th March (Lunch), What Did We Do???

Okay, it was finally the time for the real observational drawing of my panda... I had to use the black ink (ah, I had to be careful not to flick any onto my blouse), and a stick to sketch this. I found this quite hard; it was much easier to sketch with a pencil!
Well, I started, and I realised that I was very slow compared to other people. When I had just finished my outline of the panda, other people had nearly finish shading in the tone!!!
Aaargh!! I had to work faster. The last 10 minutes or so, had me flicking ink everywhere while I desperately tried to finish my drawing, which now looked like a random bald bear. I felt so depressed... My drawing didn't have any furriness, which is texture, or tone. It was so bare!!! Its face also didn't have much expression at all. I seriously needed much more time.

So, to actually make my drawing look like a panda, I spent my lunch on the next day (14th) to finish this observative drawing. Angela helped me a lot as well (THANK YOU ANGELA!!! :D), and I finally actually put some tone and fur in it. I had to work a lot especially on tone; since the whole drawing was all about tone, not colour, that was the most important factor that made my drawing realistic and 3D. Also, some fur drawn on the face and wavy lines on the outline showed the slight fur that my panda had. I think this is called simulated texture?!?!
Well, now, I am quite satisfied with it, even though I could have done better. I learned to observe the object much more carefully, and find even the slightest trace of shadow to draw. =)

11th March, What Did We Do???

Today we made another observational drawing of a plush toy, which would be for assessment. First, we did a 5-second sketch of the outline of the plush toy with a pencil. (Mine was a small panda.) Then, we stuck bits of coloured tissue paper onto the parts of the drawing, to distinguish the outline and the shape of the plush toy as well as have the element of colour. After that step, we blocked our drawing with different waterwashed colour paints, to bring out the tone and the artistic ways of the drawing a lot more. It didn't look anything impressive, especially the blocking part, but I hoped that it would look much better when I had finished the sketch with black ink. Some of the drawings that Mrs Vincent showed us were so good!!! I wish I could do as well as those people!!! XD
That was my short reflection for today!